")
This is a multipart series we are putting together to walk through automation of DevSecOps for mobile solutions. We are going to focus on iOS, but much of this is applicable to Android as well. Our goal is to leverage GitLab as the CI/CD engine and other services like AWS Device Farm, SonarQube, and NowSecure for testing. Finally, the app should pre-stage by self publishing to Apple's App Store for TestFlight publishing.
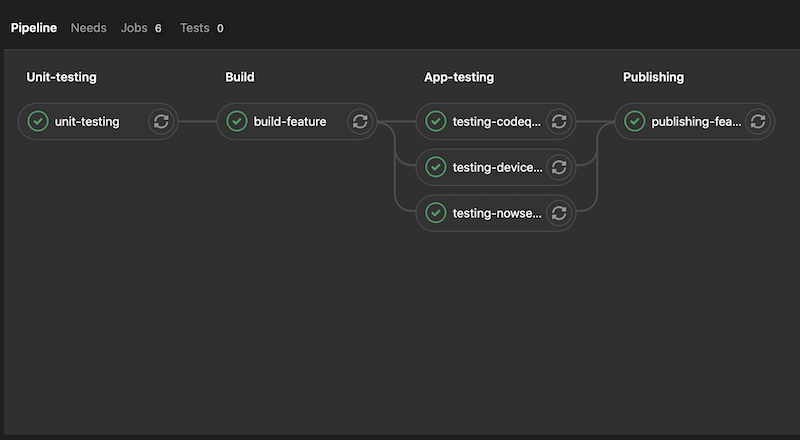
We want to see our CI/CD pipeline, at a minimum look like this:
For as many mobile solutions that exist out there, the write ups and documentation that exists to automate testing, specifically UI testing is substandard to say the least. This post will lay out some of the techniques we leverage to automate the testing of mobile apps (iOS specifically) to perform fully automated UI testing.
iOS Testing in AWS Device Farm
We leverage AWS Device Farm to implement testing—the capabilities of Device Farm are fantastic, the difficult bit is the practical application of documentation.
Again, everyone talks about automated testing, but who is actually doing it?
We'll dive into AWS Device Farm later.
Creating the test projects
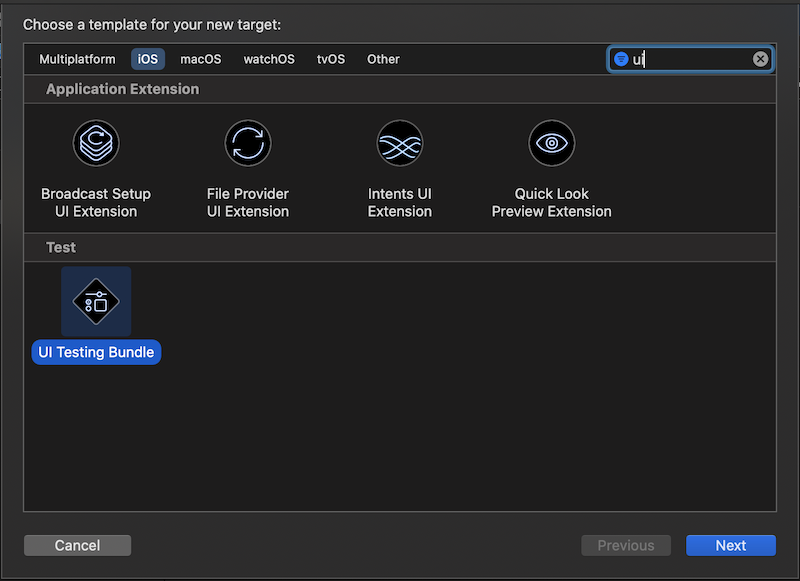
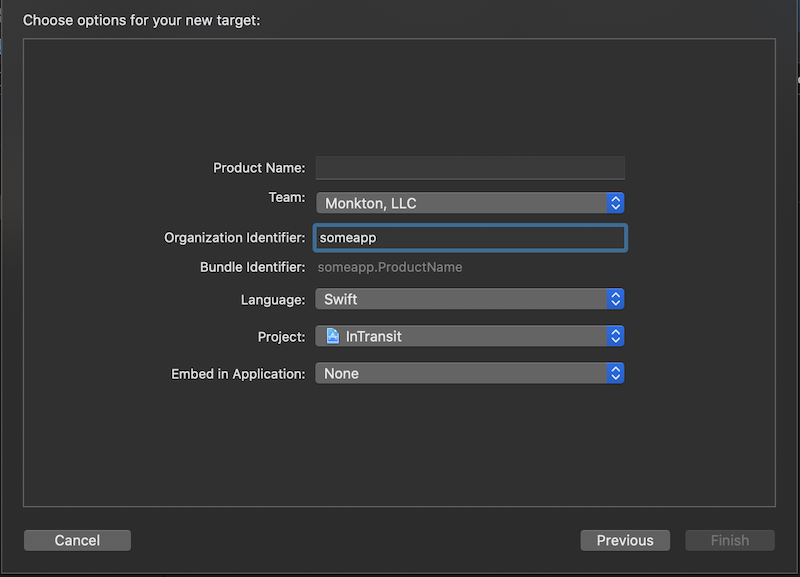
To get started, in your application you'll want to add a new target to your app, a UI Testing Bundle. Provide a product name, select the target you will add it to and you are ready to start building test cases.
Adding the new Target
Configuring the new target
Writing test cases
When Xcode runs your test cases, it will relaunch your application every test case. This persists state, so it allows you to pick up where you left off.
In our (testing) development strategy for building out these test cases, we have developed a Singleton "helper" class that handles much of the authentication and/or registration necessary to log users in. But, this in itself introduces some complexities.
- What do you do for new users
- What do you do for existing users
- What do you do for users who may have left the app in the middle of the startup process
- What do you do for users who may not be allowed to use the app
- What do you do for users who are locked
- etc...
Configuration File Helper
First and foremost, we drive most of our testing by a configuration file. This configuration file provides some potential overrides as well as account information. We have a local-testing-config.json as well as the testing-config.json file to drive this configuration.
Obviously, locally we run the local-testing-config.json file. This has secrets in it and we prevent it from being checked into git (adding a local-testing-config.json to our .gitignore file).
In our CI/CD pipeline, we then pull the legitimate file from a secure location or, alternatively, pull the secrets from a secure location and inject them into the testing-config.json file. How you do that, is up to you. This should be done, obviously, before you build the solution.
Our sample testing-config.json file is as follows:
{
    "apiServiceKey": "",
    "accounts": {
        "alreadyConfigured": {
            "email": "demo1@monkton.us",
            "password": ""
        },
        "needsToSetupProfile": {
            "email": "demo2@monkton.us",
            "password": ""
        },
        "registerAccount": {
            "email": "demo3@monkton.us",
            "password": ""
        },
        "doneAccountSetup": {
            "email": "demo4@monkton.us",
            "password": ""
        },
        "accountLocked": {
            "email": "demo5@monkton.us",
            "password": ""
        }
    }
}
As one can see, we provide unique names to each of the accounts, allowing us to grab the account and perform test cases with it. Your naming strategy should suit your desired testing goals.
This file gets injected into your testing application during build time.
Singleton Authentication Helper
While we aren't going to go into all the code necessary for building out a test framework, we'll touch on a bit of it here. Our singleton helper class is called AppAuthenticationTests, the implementation is here:
import Foundation
import XCTest

/* We may prompt or ask for permissions so ones to accept */
enum AppTestUIPermission {
    case push
    case location
    case microphone
    case camera
    case calendar
    case contacts
    case bluetooth
    case motion
    case photos
    case reminders
    case pii
    case welcomeBanner
}

/* Indicates the login success or failure */
enum AppTestLoginExpectation {
    case success
    case error
    case locked
}

/* Helper class */
class AppAuthenticationTests {

    /* Nothing */
    fileprivate init() {}

    /**
     Declares the App authentication test provider
     */
    public static var `default`: AppAuthenticationTests = AppAuthenticationTests()

    /**
     Launches the application itself.

     - Parameter reset: indicates if the app data should be reset
     - Parameter completion: A callback once the app is launched
     */
    func launch(reset: Bool = false, completion: ( (XCUIApplication) -> Void )?) throws {

        let app = XCUIApplication()
        if reset {
            app.launchArguments = ["UI_TEST_RESET"]
        }
        app.launch()

        completion?(app)
    }

    /**
     Finds an account authenticate with

     - Parameter accountIdentifier: the identifier to look for
     */
    func accountFromConfig(accountIdentifier: String) -> AppTestAccount? {

        // Validate accounts exist
        guard let serviceKeys = ForTestingAppConfiguration.default["accounts"] as? [String:Any] else {
            return nil
        }

        // Validae this account exists
        guard let accountDetails = serviceKeys[accountIdentifier] as? [String:String] else {
            return nil

        }

        // The account to return
        let foundAccount = AppTestAccount()

        foundAccount.email = accountDetails["email"]! as String
        foundAccount.password = accountDetails["password"]! as String

        return foundAccount

    }

    /**
     Logs the user into the app itself

     - Parameter accountIdentifier: the identifier to look for
     - Parameter loginExpectation: the expected login result
     - Parameter test: the test we are operating in
     - Parameter permissions: permissions we will accept
     - Parameter completion: A callback once authenication completes
     */
    func login(accountIdentifier: String, loginExpectation: AppTestLoginExpectation, test: XCTestCase, permissions: [AppTestUIPermission] = [], completion: ( (XCUIApplication, AppTestAccount?) -> Void )?) throws {

        // We want to wait for the account provider to finish, we will
        // leverage a semaphore here
        let semaphore = DispatchSemaphore(value: 0)

        // The account we will grab
        var accountOuter: AppTestAccount? = nil

        // Grab the account
        AppTestingCredentialProvider.default.account(accountIdentifier: accountIdentifier) {
            (account) in

            accountOuter = account

            // Done
            semaphore.signal()

        }

        // wait for the semaphore to be signaled
        semaphore.wait()

        // The account should have a value always
        if accountOuter == nil {
            XCTAssertFalse(true)
        }

        // Launch the account, pass the flag into the app
        // The app launch should look for teh argument and reset the
        // app if it contians this argument
        let app = XCUIApplication()
        app.launchArguments = ["UI_TEST_RESET"]
        app.launch()

        // Wait for the button (We use static identifiers for accessability identifiers)
        _ = app.buttons[AppTestIdentifiers.WelcomeScreen.loginButton].waitForExistence(timeout: 10000)

        test.screenshot(withFileName: "welcome-screen.png")

        // Tap the login button
        app.buttons[AppTestIdentifiers.WelcomeScreen.loginButton].tap()


        // Wait for the email field
        _ = app.textFields[AppTestIdentifiers.UsernamePasswordLoginScreen.emailTextBox].waitForExistence(timeout: 10000)

        // Wait for the password field
        _ = app.secureTextFields[AppTestIdentifiers.UsernamePasswordLoginScreen.passwordTextBox].waitForExistence(timeout: 10000)

        test.screenshot(withFileName: "login-screen.png")

        // Entry
        let emailtextTextField = app.textFields[AppTestIdentifiers.UsernamePasswordLoginScreen.emailTextBox]
        emailtextTextField.tap()
        emailtextTextField.typeText(accountOuter!.email!)

        // Entry
        let passwordtextSecureTextField = app.secureTextFields[AppTestIdentifiers.UsernamePasswordLoginScreen.passwordTextBox]
        passwordtextSecureTextField.tap()
        passwordtextSecureTextField.typeText(accountOuter!.password!)

        // Login now
        app.buttons[AppTestIdentifiers.UsernamePasswordLoginScreen.loginButton].tap()

        if loginExpectation == .success {
            // This is good, do nothing
        }
        else if loginExpectation == .error {
//            Could not login

            test.addUIInterruptionMonitor(withDescription: "Could not login") {
                (alert) -> Bool in

                if alert.buttons["OK"].exists {
                    alert.buttons["Allow"].tap()
                }

                return true

            }

        }

        // Wait for tab bar
        _ = app.tabBars["tabBar"].waitForExistence(timeout: 10000)

        // Permissions
        _ = XCUIApplication().staticTexts.matching(NSPredicate(format: "label CONTAINS 'App Permissions'")).element(boundBy: 0).waitForExistence(timeout: 10000)

        // Dismiss permissions popup
        XCUIApplication().navigationBars.children(matching: .button).firstMatch.tap()

        // Done now
        completion?(app, accountOuter)

    }

}
Now, once this is in place we have an easy means to authenticate our user in a repeatable manner. Note, Xcode has no means to order tests other than alphabetical order. So, we adopt a pattern of test_Account_A_Step_1, test_Account_B_Step_1, etc to facilitate that.
/**
    Log the user into the app itself
*/
func test_Account_A_Step_1() throws {

    // Authenticate the user with the app
    try AppAuthenticationTests.default.login(accountIdentifier: "alreadyConfigured", loginExpectation: .success, test: self, permissions: [ .push, .location, .contacts, .camera ]) {
        (app, account) in

        self.account = account

        _ = app.tabBars["tabBar"].waitForExistence(timeout: 10000)

        // Tap settings (3rd element, not easy to set and access accessability identifiers for tabs)
        app.tabBars["tabBar"].buttons.element(boundBy: 2).tap()

        _ = XCUIApplication().staticTexts.matching(NSPredicate(format: "label CONTAINS 'Settings'")).element(boundBy: 0).waitForExistence(timeout: 10000)

    }

}
Building for testing
To build the test cases, you'll tap Command + Shift + U within Xcode. This will build the tests and provide you compilation errors. To run the unit tests, tap Command + U and it will run them on the selected device or simulator.
Automating this process is not as simple. To automate, we shall build from the command line. Be warned, this is an exercise in frustration to get it right.
To get started, we will be using xcodebuild's build-for-testing option. This will build the app as well as the test harness. This combination can then be uploaded to AWS Device Farm for automated testing.
Here we provide a sample bash command to run the build. Each of these attributes are self explanatory:
xcodebuild build-for-testing -workspace ${WORKSPACE_PATH} \
    PLATFORM_NAME=iphoneos \
    -destination "generic/platform=iOS" \
    -scheme ${PROJECT_SCHEME} \
    -derivedDataPath $DERIVED_DATA \
    -sdk iphoneos \
    -configuration ${CONFIGURATION} \
    archive -archivePath $ARCHIVE_PATH \
    PROVISIONING_PROFILE_SPECIFIER="$SETTING_PROVISIONING_PROFILE_UDID" \
    PROVISIONING_PROFILE="$SETTING_PROVISIONING_PROFILE_UDID" \
    CODE_SIGN_STYLE="Manual"
Of note, we override the PROVISIONING_PROFILE_SPECIFIER and PROVISIONING_PROFILE, passing the UDID from the provisioning profiles in manually. We do this, because in our CI/CD pipeline, we do not enable automated code signing. We manually set the profiles and code sign to avoid having to "login" on the build server.
Next, you will want to export the archives and resign them:
xcodebuild -exportArchive \
    -archivePath $ARCHIVE_PATH \
    -exportOptionsPlist $OPTIONS_LIST \
    -exportPath $BUILD_DIR/exported

if [ "$RESIGN_ENTITLEMENTS" = "true" ]; then
    # Resign for upload
    unzip "$BUILD_DIR/exported/${IPA_NAME}" -d "$BUILD_DIR/exported/tmp"
    #> /dev/null 2>&1
    codesign --entitlements "$CODE_SIGNING_ENTITLEMENTS" --preserve-metadata=entitlements -f -s "$CODE_SIGNING_PROFILE" "${APP_LOCATION}"
    codesign -d --entitlements - "${APP_LOCATION}"
    cd "$BUILD_DIR/exported/tmp"
    rm -rf ../myapp.ipa
    zip -r ../myapp.ipa .
    #> /dev/null 2>&1
    cd "$THE_PWD"
fi
CODE_SIGNING_PROFILE represents the common name of our Developer/Production Apple signing certificates. Limitations in Xcode and the build system prevent us from just letting Xcode sign them with xcodebuild, so we leverage codesign here to perform the manually.
After this is complete, you will have your myapp.ipa built as well as your myappUITests-Runner.app runner for AWS Device Farm.
Caveats and issues
One issue we ran into was the conflicting automated signing process. We have to disable this for the build server, but want to keep in place for the developers. To do this, we call sed:
sed -i '' 's/CODE_SIGNING_ALLOWED = YES/CODE_SIGNING_ALLOWED = NO/g' ${XCPROJECT_PATH}/project.pbxproj
sed -i '' 's/CODE_SIGNING_REQUIRED = YES/CODE_SIGNING_REQUIRED = NO/g' ${XCPROJECT_PATH}/project.pbxproj
This then allows us to manually perform the code signing ourselves.
AWS Device Farm
We'll walk through in another blog how to deploy this to AWS Device Farm, then wait for testing to complete with a pass/fail status.