
There have been a few tactical edge cloud computing devices appear over the past couple years, but because of Amazon Web Services dominance, the Snowball Edge "Cloud in a Box" is undeniably the market leader. With its storage capacity up to 100TB, 52 vCPU/GPU, and 208GB of memory, every Edge device can transport data at speeds faster than the internet, and for organizations that do work at the edge, this device has enough horse power to do virtually anything—you can build a cluster with 5+ SBE and maintain 99.999% data durability. But how does the Snowball Edge Work?
How the Snowball Edge Works
The SBE is ordered via the CLI (Command Line Interface) or the Web Console. Before you can order a SBE, you must (should) define at least one AMI to use with it. We generally choose Ubuntu because it has the most options available. Our typical distribution involves simply installing Docker CE to run containers within the SBE.
When ordering the SBE, you will specify the type of SBE to order and define the AMI you want, as well as shipping options of 1 or 2 day shipping. A note on shipping, your device does not ship until one is available.
Base Architecture
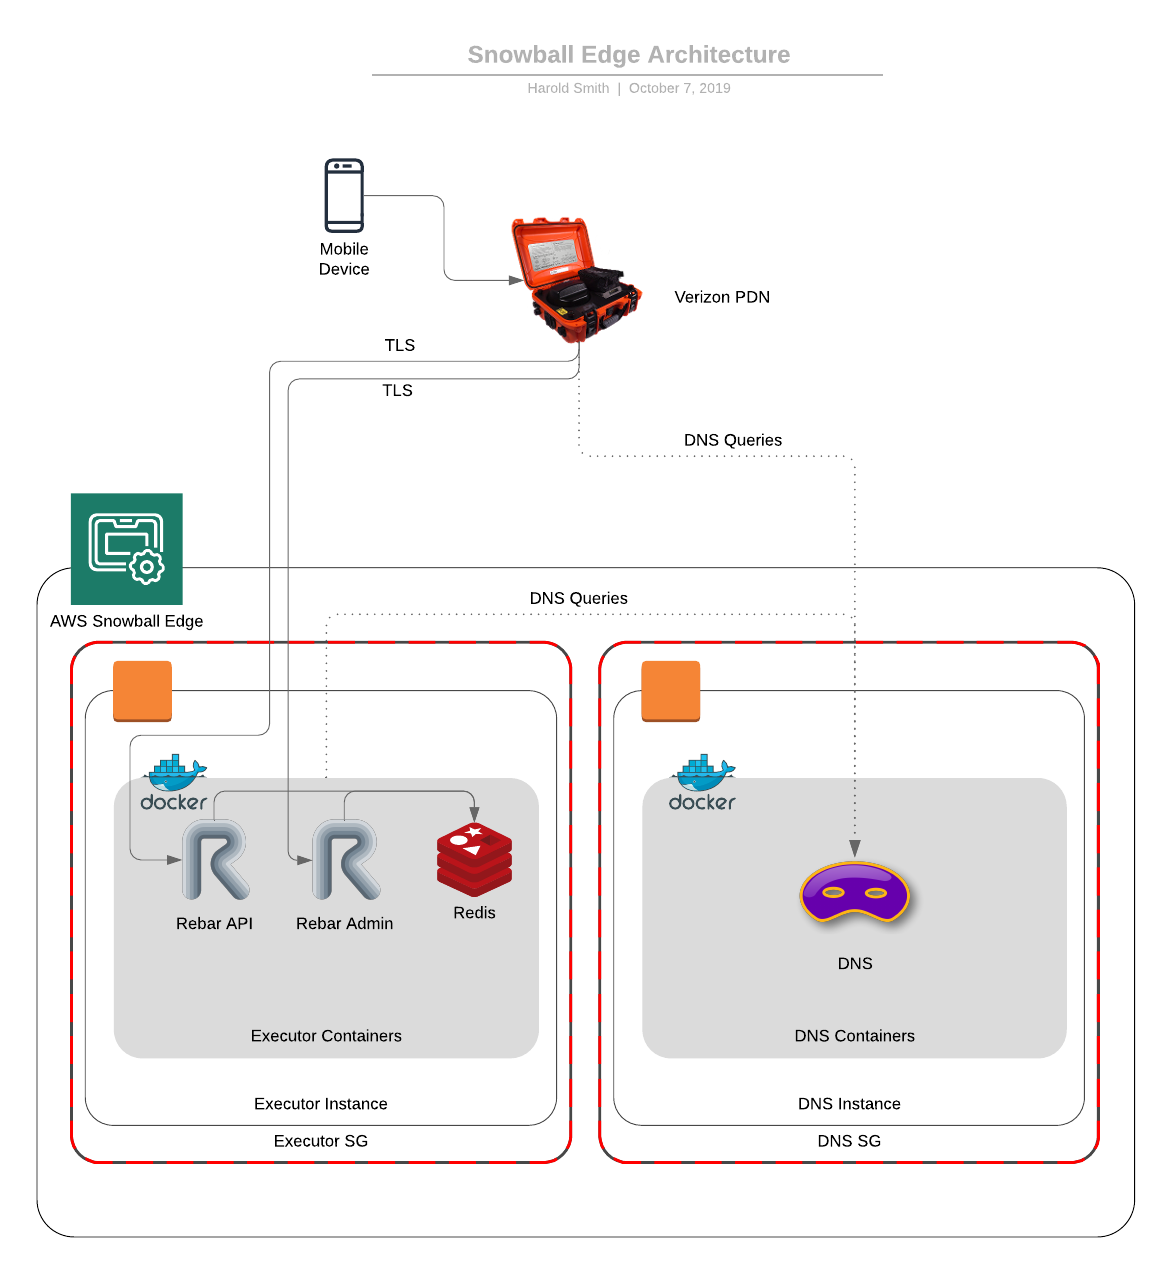
This architecture has one main goal: Provide mobile devices a service to interact and connect with while completely disconnected. Secondary, leverage a device like the Portable Data Network (Cell tower in a box) from Verizon to provide connectivity to the outside world.
The way we will architect the software is, when a user performs an action on the mobile device, it will sync with the SBE via the PDN. The data will be stored on the SBE. If the SBE determines it has network connectivity to the outside world (via the PDN), it will attempt to push cached data to the master server. Obviously, this architecture could get a bit more complex if we wanted (aka, app server could try to sync with cloud database instead if it is available).
Base Snowball Edge AMI
For Snowball Edge, we went with Ubuntu 16.04 LTS. First, we instantiated a server in our AWS EC2 stack. From there, we customized the server a bit before creating an image. For our configuration, we harden the image first, install Docker CE, and a few helper CLI tools. This gives us most of what we need to update the stack in the field.
Our eventual goal will be to use a product like microk8s.io to manage images that will reside on the machine. Our "Snowball Edge Manager" we will be releasing in Q1 will leverage this to manage the Snowball Edge AMI instances running on the SBE.
Once we have configured our AMI, we create a new machine image. Tag it with something and provide a usable name for when you create your Snowball Edge Job.
Creating a Job
Browse to the Snowball console (this all can be done through the CLI as well):
- Tap
Create Job - Select Country
- Select
Local Compute and Storage
Tap Next
- Provide a
Shipping Addressand selectShipping Speed
Tap Next
- Provide a
Job Name, select theCompute Jobtype, select theS3 Bucket, then selectEnable Compute with EC2yourAMIimage for the SBE. You can have multiple AMIs on the SBE, optionally set aLambdafunction.
Tap Next
- Select an IAM role for the job
- Select a KMS key to protect the data
Tap Next
- Select an SNS Role for notifications
Tap Next and Create Job after you confirm.
Once this is done, once a Snowball Edge is available that meets your criteria it will be shipped to you. The "Shipping Speed" is only after the order has been fulfilled.
Getting the SBE
Once you have the SBE, you will want to boot it up. Upon booting, you will need to grab the IP address off the box. Toggle the connection screen and setup Static for the box configuration. Configure a static IP for the SBE and tap Apply on the screen. Write down the IP Address for later usage as the $IP variable in our bash scripts.
Unlocking the device
When we show some bash scripts here, we will use variables we can drop into a script. You'll see $IP for the device IP address, $REGION for the region the device was from, and $PROFILE for the named profile in our ~/.aws/credentials file.
To unlock the SBE, you will need to get the manifest and unlock code from the SBE AWS portal. Once you have that, you use the `snowballEdge unlock-device' command:
snowballEdge unlock-device \
    --endpoint https://$IP \
    --manifest-file $FILE \
    --unlock-code $CODE
You can see the status of the unlock with the command
snowballEdge describe-device --endpoint https://$IP --manifest-file $FILE --unlock-code $CODE
After the device has been unlocked, you will need to generate access keys for the SBE to add to your AWS profile using the command:
snowballEdge list-access-keys \
    --endpoint https://$IP \
    --manifest-file $FILE \
    --unlock-code $CODE
Once you have the --access-key-id variable, run the following command to get the secret key:
snowballEdge snowballEdge get-secret-access-key --access-key-id :accesskey: \
    --endpoint https://$IP \
    --manifest-file $FILE \
    --unlock-code $CODE
Once the access keys have been captured, create a new profile in your ~/.aws/credentials file.
Provisioning the Containers in EC2
For our SBE in this instance, we are going to provision two EC2 images. One will be the data storage/app servers and the other will be the DNS service. An entire EC2 image for DNS is overkill, so you could collapse them down into a single one if you desired. But, for our use, we wanted to show mapping another EC2 image to a local DNS server.
Security Groups
SBE behaves just like AWS. You will want to define security groups for your EC2 servers. To list security groups execute:
aws ec2 describe-security-groups --endpoint http://$IP:8008 --profile $PROFILE --region $REGION
Here you will see default groups, you can leverage the aws ec2 commands with the --endpoint http://$IP:8008 flag to issue EC2 commands on the box, for actions like creating new security groups.
Auto Launch
For the SBE, we will want to create an launch template and an auto-start configuration. This will enable us to have the EC2 images boot instantly on launch.
To create a launch template, we will need to find the image we want to use, in addition to the security groups above.
To get the list of AMI on the device, run:
aws ec2 describe-images --endpoint http://$IP:8008 --profile $PROFILE --region $REGION
After that has been obtained, we will use the AMI identifier, an instance type, and a security group to create the launch template:
TEMPLATE='{"ImageId":"s.ami-xxxxxxxx","InstanceType":"sbe1.xlarge","SecurityGroupIds":["s.sg-XXXXXXXXXXXXXX"]}'
aws ec2 create-launch-template --launch-template-name "dns-server" --launch-template-data $TEMPLATE --endpoint http://$IP:8008 --profile $PROFILE --region $REGION
Once the launch template is generated, you can describe the templates by running:
aws ec2 describe-launch-templates --endpoint http://$IP:8008 --profile $PROFILE --region $REGION
Next, we will define a auto-start configuration. We will use static IPs on this box to define the DNSMASQ service and our app server EC2 images:
DNSMASQ Launch configuration (Static IP of 192.168.1.226):
snowballEdge create-autostart-configuration --physical-connector-type RJ45 \
    --ip-address-assignment STATIC \
    --static-ip-address-configuration IpAddress=192.168.1.226,NetMask=255.255.255.0 \
    --launch-template-id s.lt-template-id\
    --endpoint https://$IP \
    --manifest-file $FILE \
    --unlock-code $CODE
App Server Launch configuration (Static IP of 192.168.1.228):
snowballEdge create-autostart-configuration --physical-connector-type RJ45 \
    --ip-address-assignment STATIC \
    --static-ip-address-configuration IpAddress=192.168.1.228,NetMask=255.255.255.0 \
    --launch-template-id s.lt-template-id\
    --endpoint https://$IP \
    --manifest-file $FILE \
    --unlock-code $CODE
Once these are good, reboot the device and unlock it. The SBE will automatically start the EC2 images. Once rebooted and unlocked, give about 10 minutes for the EC2 images to become operational. From there, we can now SSH into the servers.
DNSMASQ
Once our SBE has rebooted and the EC2 images are up and running (automatically!) we will want to configure our server and DNSMASQ.
First, disable cloud-init
sudo touch /etc/cloud/cloud-init.disabled
First, SSH into the box with your EC2 SSH key. Once you have logged in, disable the EC2 init from running each time. This will prevent our DSN configurations from being reset and it will prevent the SSH configuration from being reset each time.
Once you have booted the DNSMASQ, server, you will need to configure it with Docker.
First, lets build our DNSMASQ configuration. We already know the domain names we care about. We will point those few domain names to our App Server located on IP 192.168.1.228.
touch the file /ubuntu/home/dnsmasq.txt and paste the following into it. This will be for the domain compliant.app and our Snowball Edge services that run on it.
#dnsmasq config, for a complete example, see:
#  http://oss.segetech.com/intra/srv/dnsmasq.conf
#log all dns queries
log-queries
#dont use hosts nameservers
no-resolv
#use cloudflare as default nameservers, prefer 1^4
server=1.0.0.1
server=1.1.1.1
strict-order
#set domain of local
domain=compliant.app
local=/compliant.app/
#set dhcp server to use range 192.168.0.0/24.  Start at IP at 10
dhcp-option=3,192.168.0.1
dhcp-range=192.168.0.10,192.168.0.150,255.255.255.0,12h
#explicitly define host-ip mappings EXAMPLES

# Local Configuration
address=/sbe-admin.compliant.app/192.168.1.228
address=/sbe-api.compliant.app/192.168.1.228
address=/sbe-webservices.compliant.app192.168.1.228
Save the file and exit.
Now, we will need to update our DNS configuration to point to itself as the DNS server.
Run the following commands:
touch /etc/resolvconf/resolv.conf.d/head
Edit the file and add the line:
nameserver 127.0.0.1
Run the update command:
sudo resolvconf -u
Then, reboot the server (This is not required, but I like to do it):
sudo reboot
Now that the DNSMASQ server has been configured, we can configure the App Server
App Server Configuration
First, disable cloud-init
sudo touch /etc/cloud/cloud-init.disabled
SSH into 192.168.1.228 for the App Server. From here, again, disable cloud init.
Here we will go in and configure DNS to point to the server 192.168.1.226.
Edit the file:
Add the line
Run the following commands:
touch /etc/resolvconf/resolv.conf.d/head
Edit the file and add the line:
nameserver 192.168.1.226
Run the update command:
sudo resolvconf -u
Then, reboot the server (This is not required, but I like to do it):
sudo reboot
SSH back into the box and continue to configure your Docker images as you so desire. We generally pull down SSL certs and configure an NGINX proxy on the box to direct traffic to the appropriate Docker containers. Those host names for NGINX are referenced in the DNSMASQ configuration above.
Configuring the PDN / Cradlepoint
The PDN is driven by a Cradelpoint embedded in it. We won't get into a deep configuration of the Cradlepoint here, but a high level overview.
In the Cradlepoint, we want to configure it to use the DNS server at 192.168.1.226. This will then have DHCP leases that are issued to the devices connecting to it to point to the local server 192.168.1.226. So, DNS mappings for the SBE for devices that connect to it, will point to our App Server EC2 instance. If we are purely disconnected or even have connectivity, DNS queries for our local app domains will all be routed to the DNSMASQ server and will then serve up the host names to the 192.168.1.228 address of our SBE App Server. All non-local DNS queries will be served up to 1.1.1.1 (Cloudflare) as the fall back (When connected).
Voila.
Other Things
We also like to create new SSH keys so we don't have to leverage our SSH keys from AWS proper locally. So, if we forward deploy a SBE, we can be assured that our private SSH keys for AWS are not in the wild.
Strategies for SSH keys can include on per EC2 image or one for all. Evaluate your options based on risk.